zondag 10 februari 2013

PANPASTEL UK CHALLENGE #6, LOVE & ROMANCE


Hey goodmorning on this fabulous Sunday,we have another fabby Challenge over at the 

Did you ever visit our 
 generous sponsor 


they have a fabulous prize for the winner of the challenge.....check out the store guys, and you will have fun and will find everything you  need to keep on crafting....wohooooo check this out ...
This week over at the PanPastel UK Challenge Blog we have a challenge theme called, Love and Romance, now this is not that hard eh? Better get your thinking cap on and get crafty, you can even win a fabby prize.
Come on over to the Challenge Blog and do join into the fun. And fun is what your gonna have....check it out...
So this is what I made.....


So I made a heartshaped card, worked with the brownish PanPastels and stamped the swirl from The Wendy on the front, I colored the swirl with the Graph-it Markers and placed a bit of gold stickles on top, to give it that classy look.


Oke here we have the inside of the Heartshaped card....I chose the image of this lovely vintagy girl.....I just love to work with the vintage images, I colored her a bit with the Graph-it Markers, and worked on the border with hearts too, I played with the Pinkish soft Color. Both sides of the Heart have a Noor Design heart on it. Aren't they just great...
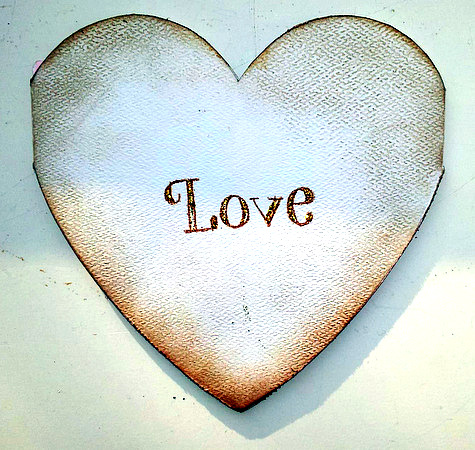
And where there is a front.....yep there is a back too....lol......so this is the back of the heartshaped card and I played with the PanPastels too....Another sentiment stamped on it and some gold stickles and my Love and Romance project is done...so now I hope you like what I made and it will take you to the PanPastel UK Challenge for another peek of what amazing projects my amazing teamies made for your inspiration. Just check it out guys and if you want to leave me a little love, please do I just love reading your comments. 

Hugs Terry 
xxxx


zondag 3 februari 2013

PANPASTEL UK CHALLENGE #5- ANIMALS.....AND MORE....


Hey there guys, it is Sunday, so that means we have another fabulous challenge over at the PANPASTEL UK Challenge Blog...
Did you ever visit out 
 generous sponsor 


they have a fabulous prize for the winner of the challenge.....check out the store guys, and you will have fun

The theme for this weeks challenge is Animals....so you can make whatever you like as long as it has an animal in your project. This is what I made....

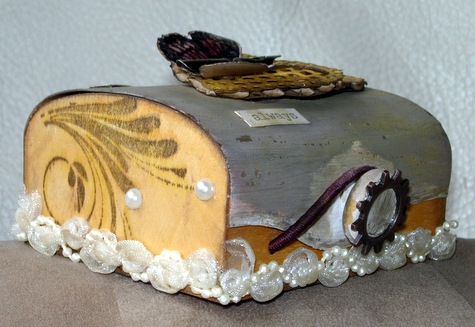
I made a Treasure Chest, with lots of Gesso, PanPastels, Graph-it Markers and Distress inks and yesss Crackle....lol...and the people who know me so well know that I just loveeeeee Butterflies and Crackle lol. 


The Top of the box is colored with the Pans and I covered it with Crackle to give it an even older look. The hearts that I placed are made with a Noor Design Die and then colored with the Graph-it Markers. I placed the hearts onto corrugated paper. The edges are worked on with Panpastel Raw Umber and Diarylide Yellow.
The butterfly is the fabulous one from the Wendy Vecchi and I just love it, placed a Pen Nib on top to decorate it some more....I worked on the Treasure Chest with distress inks and crackle and my top of the treasure chest is done.....and offcourse a sentiment could not be missed, I played with the Chit Chat stickers from Tim Holtz. 


The side of the Treasure Chest has been colored with the Graph-it Markers, did you ever use them? You  did not.....my goodness you don't know what your missing cause they are really cool and work on all kinds of  materials and they blend so well together. So I had lots of fun coloring with them. The pretty swirl is stamped onto the side and it is from The Wendy Vecchi's stampset. 


This is the backside of the box, I thougth it would look nice to place a metall piece on the back and in the middle a pearl to give it a classy look. 


And this is the front of the Treasure Chest, it has a metall piece from Tim Holtz on it and the borders are worked on with that fabby lace with pearls....So I hope you like what I made for your inspiration, 

You wanna have fun too, then I suggest you come over to the 


and do join into the fun and fun is what your gonna have and while your there check out my amazing teamies creations to see what they made also for your inspiration....Your going to love what your about to see, I am sure of it.  and above all HAVE LOTS OF FUN......

I would like to join into the following challenges:


Thank you for your time and if you would like to leave me a little love, be my quest.....I really love to read your comments...thank you so much......

Hugs xxxxxxxxxxxx


zaterdag 2 februari 2013

SATURDAY STEP X STEP FRILLY AND FUNKY, ALTERED HEARTSHAPED BOX

Hey there guys, this time it is my turn to do a Step X Step Post for Frilly and Funkie ....wohoooo.
I altered a Heart shaped box and will show you how I made it and the materials that I used.


Oke here we go, the materials that I used for the hearshaped box is offcourse a box, a nice piece of lace, distress crackle White Picket Fence, Distress Crackle Stickles Rock Candy, Distress Stains; Metallic and Fired Brick, Distress Ink; Victorian Velvet, Fired Brick, Tattered Rose, Vintage Photo and Walnut Stain, and the .....I will put them all underneith the post. 


For the word LOVE I worked with the Embossing Folder from Tim Holtz, Valentine. I embossed the words and cut them out, worked on it with Fired Brick and the Crackle White Picket Fence...


And for the hearts I stamped the hearts from the stampset Valentine from Tim Holtz and played on it with Distress Stain Fired Brick, sprayed some water on it to make the color a little softer and on top Crackle Accents.


The box first layer was worked on with Gesso and  the lace was white before.....but when I was done with it, it had two different colors, the Metallic Stain was used and the Victiorian Velvet Distress Ink. The box was colored with the Fired Brick and Metallic Stain and on top I played with the Crackle White Picket Fence to give it this crackled look.


So this is the finished look on the top of the Heartshaped Box.....I am very pleased with it.


So offcourse now it is time to decorate the box, remember the colored white lace.....well I placed it on the side of the top of the heart box. I think it looks pretty good like this....so what do you think?


The rose on the right side is not worked on with anything, that is how I started....the roses on the left side are worked on with glimmermist and with Utee, don't you just love the Porcelain look......I do...
It is very easy to do, you dip the roses into the Utee when they are still wet, then you dry with your heattool and do this a few times.....After 3 or 4 times of dipping the roses into Utee you get this look.


So the lit of the heartshaped box was decorated with the 3 roses, the Hearts, the sentiment LOVE and a butterfly from the Wendy Vecchi, and the corner underneith....I am pleased with it and I hope that you liked the Step X Step that I have made for you. I hope when you do you will have lots of fun with it.


And this is the side of the box, I hope you like my altered project. By the way you can purchase all the products that I used on the project in Linda's shop.....just click the linky below and it will take you there.
Thank you for listening and watching my Post.

Most of all....have lots of fun altering a box...
Hugs Terry xxxx


dinsdag 29 januari 2013

Guest Designer Noor Design, Vintagy Valentine Card AND MORE


As a Guest Designer heb ik een Vintage kaartje gemaakt voor Valentijn en daarvoor heb ik veel stansen van Noor Design gebruikt.


As a Guest Designer I have made a Vintage card for Valentine and  I chose lots of Noor Design Dies.


I started out with cardstock and made a card out of it. I used the Cutting and Embossing die Noor Rond nr. 3 6003/1003 and colored it with Distress Stains and used a swirl stamp on it. 

Ik ben begonnen met een stuk rond cardstock en heb die als kaart gebruikt. Voor de eerste laag op de kaart heb ik de  Cutting and Embossing die Noor Rond nr. 3 6003/1003 gebruikt en gekleurd met Distress Stains en gestempeld met een swirl stempel. 


The image is a sweet vintage girl and I just love the vintage images. On the right side of the image  played with the Floral and Flourishes die heart, 6003/0005 and colored it with Vintage Photo and some distress stickles and when I was done I placed it onto some corrugated card. 

De afbeelding is een lief vintage meisje en ik vind deze echt te gek om te gebruiken voor mijn  kaarten.  Aan de ene kant van de afbeelding heb ik gekozen voor de Floral and Flourishes hart, 6003/0005 en gekleurd met Vintage Photo, Weathered Wood en Stikles. De harten zijn geplaatst op een stuk ribbel karton. 


On the other side of the image I played with the Vintage Flourishes 6003/0024 and colored them with Weathered Wood distress ink and the Metallic ink. On top a few roses worked on with some stickles. 

Aan de andere kant van de afbeelding heb ik gekozen voor de Vintage Flourishes 6003/0024 en deze ingekleurd met Weathered Wood distress inkt en de Metallic Brushed Pewter inkt. Boven op de prachtige bloemetjes van Noor Design heb ik een paar roosjes geplaatst en bewerkt met stickles.  


On top of the card I cut out a Vintage Flourishes Butterfly 6003/0023 and glued it onto a piece of cardstock. The edges were colored with Distress Ink and some Stickles to give an extra shine to it, just what I had in mind.

Boven aan de kaart heb ik gespeeld met de Vintage Flourishes Butterfly 6003/0023 en deze uitgestanste Vlinder op een stuk cardstock geplakt. De randen zijn gekleurd met Distress inkt en wat extra stickles op de randjes van de Vlinder maken de vlinder precies zoals ik in mijn hoofd had.


I would like to join into the following challenges:


Thanksss for watching and reading my post. I hope you liked it.
If you want to leave me a little love then please do, I would really appreciate it


zondag 27 januari 2013

PANPASTEL UK Challenge 4, Seeing Stars.....


Hey there guys, it is Sunday, so that means we have another fabulous challenge over at the PANPASTEL UK Challenge Blog...

Oke here we go....
Our generous sponsor is 


they have a fabulous prize for the winner of the challenge.....check out the store guys, your not going to believe your eyes, they have everything you need for making the most wonderfull projects so really it is crafter's heaven.

I have made a canvas, for the first time but I quess there has to be a first time for everything eh? So what I did was.....I worked on a small canvas for my daughter.....


I played with these two fabby butterflies from Wendy Vecchi and played on them with Distress Markers and Crackle.....I know I know, can't live without crackle lol......I found a sentiment with the text You're a Star....


and some little star gems so I placed them too.


And how about this fabby sentiment.....I really like it cause it has the cute little butterflies on it and the sentiment says it all eh?


So this is my project for this weeks challenge over at the PanPastel UK Challenge Blog, I made this canvas for my daughter and it made her smile instantly.....and that was the whole idea behind it....hehehe....So the background is made with Gesso , what I did was, I placed Gesso on a piece of Paper and got the canvas and put it on top of the Paper so the Gesso covered the whole canvas, then I took it off and this fabby background was on it....I let it dry and used the heattool for it and then I worked on it with the Lightblue PanPastel and Brown PanPastel....it is so much fun to work with Gesso and the Pans...you should try it too, you can make such fabulous backgrounds and projects your gonna love it.
So you wanna have fun too guys, then you should come over to the PanPastel UK Challenge Blog and while your their check out my amazing teamies projects, your gonna love what your about to see, it is fabulous.....
Have lots of fun and most important thing......ENJOY and HAVE FUN.....