Posts tonen met het label Distress Inks. Alle posts tonen

woensdag 5 mei 2021

A Card for a Man.......Een kaart voor een man xxx

Hallo bloggers, weer even een post van mij, de afgelopen weken weer lekker aan het kleuren geweest en enkele kaartjes gemaakt. Dit is er eentje van.

Hello bloggers, another post from me, I have been coloring for the last couple of weeks and made a few cards with it. This is one of them....


Deze keer heb ik een mannenkaart gemaakt en ik zat te denken wat moet ik nou maken voor iemand die van dieren houdt, lekker in het bos wandelt en toen kwam dit idee. Een beetje stoer en toch ook leuk met de herten erin.
Ik heb gekozen voor de kleuren blauw en groene Distress inkt, de achtergrond heb ik bewerkt met sentiment stempels en met stencils. En natuurlijk mag de crackle ook niet missen....Een paar rendieren gekleurd en ook wat crackle erop gebruikt. Als laatste de tekst erop geplakt en klaar is mijn kaart. Ben er best tevreden over als je bedenkt dat je toch eigenlijk niet zo vaak een mannenkaart maakt. 

This time I made a card for a man, I was thinking what I could make for a guy who likes animals and loves to walk in the woods....well this idea popped up. A bit tough but also nice for a man. I chose the colors blue and green Distress ink, I edited the background with sentiment stamps and stencils. And of course the crackle should not be missed .... A few reindeer colored and also used some crackle on it. Finally, the text is pasted on it and my card is ready. I am quite satisfied when you consider that you don't actually make a men's card that often.


De producten die ik gebruikt heb zijn:

Distress Inkt
Stencil
Sentiment tekststempel
Crackle Texture Paste
Stempels herten


Hopelijk heb ik jullie wat inspiratie kunnen geven.
Dank je wel voor het bezoekje aan mijn blog.
Dat wordt zeer gewaardeerd.

I hope that I have given you some inspiration
Thank you for visiting my blog 
I really appreciate it a lot.

Ik zou graag mee willen doen met de volgende challenges:
I would like to join into the following challenges:


maandag 3 augustus 2020

Art Journal-Rozen 2

Hallo allemaal, ik heb mezelf weer heerlijk kunnen uitleven in mijn Art Journal.....

Krijg er maar geen genoeg van he, het bewerken van art journal pagina's en natuurlijk deze prachtige ROZEN van #Mariola Budek ingekleurd en erin verwerkt. Zo leuk om te doen....en hoe heb ik dat nou gedaan dan vraag je je misschien af.....

I cannot get enough of working in my Art Journal Pages and these georgous Roses from Mariola Budek. I just love them. I have colored the Roses and I have placed them in my Art Journal......and how did I do it, you might wonder....


Allereerst heb ik de Rozen ingekleurd met waterverf  en heb ik de bloemen afgemaakt met wat glitterrandjes van NUVO en wat witte randjes met een pen. Daarna ben ik  begonnen met de achtergrond van de 1ste pagina en deze te bewerken met verf, acrylverf in dit geval, beetje gespeeld met Gesso ...aangezien ik het een beetje lichter wilde hebben....en allerlei stenciltjes en stempels gebruikt van Art By Marlene, geweldig leuke stempels die je zo mooi kunt verwerken in je art journal of op kaartjes natuurlijk.  Uiteraard heb ik ook nog wat Crackle verwerkt op de achtergrond. 

First of all, I colored the Roses with watercolor and I finished the flowers with some glittery edges from NUVO and some white edges with a pen. Then I started with the background of the 1st page and edit it with paint, acrylic paint in this case, played with Gesso a bit ... since I wanted it to be a bit lighter .... and used all kinds of stencils and stamps from Art By Marlene, great fun stamps that you can use so beautifully in your art journal or on cards, of course. Of course I also added some Crackle in the background.
En voor de 2de pagina heb ik hetzelfde gedaan als bij de 1ste. Alleen de Rozen heb ik ingekleurd met oranje tinten en iets geel. Ook weer wat glittertjes gebruikt hier en daar en de achtergrond is bewerkt met Distress Inkt en stencils van Elizabeth Craft Designs met crackle en de Tekst is van Art By Marlene ...hebben jullie de Stickersheets wel eens gebruikt? Die zijn ook zo gaaf en er staan zoveel mooie teksten in. 

And for the 2nd page I did the same as with the 1st. I only colored the Roses with orange tones and a little yellow. Also used some glitter here and there and the background is edited with Distress Ink and stencils from Elizabeth Craft Designs with crackle and the Text is from Art By Marlene ... have you ever used the Stickersheets? They are also so cool and there are so many beautiful texts.


Hier het resultaat van de 2 Art Journal Pagina's. Dezelfde Rozen met 2 compleet verschillende achtergronden. 

Here are the results of the 2 Art Journal Pages. The same Roses with 2 completely different backgrounds.

De materialen die ik heb gebruikt zijn van:
The materials I used are from:

#Artbymarlene, sentiments, stempels, Art journal
#JenineSiemerinkmindfullartcollection, stencils, stempels
#Mariolabudek, afbeelding Rozen
#Stamperia, stencil
#TimHoltz - distress inkt, texture crackle paste, stencils


Ik wil graag meedoen met de volgende challenges:
I would like to join into the following challenges:


Thank you for checking out my blog and if you want to leave me a little message that would be very much appreciated. Thanks a bunh xxx


zondag 5 april 2020

WE LOVE TO CREATE CHALLENGE #4 ANYTHING CREATIVE MIXED MEDIUM GOES WITH POLKADOODLES XXX


Hi there, crafters out there.....did you know.....that we


 Have a NEW challenge over at the 


 We Love To Create Challenge Blog

are you ready for it.....sponsored by the amazingly talented Polkadoodles!!

Polkadoodles Ltd


 I made 2 wine labels for a colleque. 

So how did I create these wine labels? Well first I have cut a piece of cardstock and with a stencil of a Wine Label I created a white one.

I started to ink the background with a few colors of Distress Ink and also with the Snowball/Snowy/Bubble/Dots Stencil I played on the background of the winelabel. So I started building up different layers with lots of stamps and stencils. 


I must say that the Papillon Butterfly is still my favourite butterfly, it is a bit bigger than other stamps of butterflies and you can do loads of fun things with it. 


This time I have colored them with Distress ink and after that I played with a Bleach Pen and sort of discolored it a bit....Last but not least I have placed a sentiment from the Perfect Wishes stampset and cut it out in a few words to devide it better on my label....at the bottom I placed a piece of lace to finish it. And offcourse at the back of the Label you can write your text.


The second Wine Label is totally different than the other one, I have colored the background with Distress Inks and worked with a bleach pen on the stamped butterflies from the Bella Fleur stampset, 


I than took the doodle stichted Borders Stamp with the tiny hearts on it and stamped all around the Label, On top I placed a vintage image of a girl and worked on my roses with accents and a few tiny butterflies. So what do you think I am pretty pleased with my finished projects and it is not that hard to make, I sure hope I have given you some inspiration to try to make your onw Wine Labels, it is so much to do and when you are having a party you can hang the Label on your Wine bottle so present, card and text all at the same time. I sure love those gifts....


 The products that I have worked with are:

Bellafleur Clear stamps


So if you would like to join into the fun over at the


Than come on over by clicking on the linky and you will be suprised what my amazing teamies have in store for you ....and when you join into the fun you can even win a very nice price from Polkadoodles......so what are you waiting for guys.....


Thank you for checking out my blog and if you would like to leave me a few words, that would be just great. Thank you .....


I would like to join into the folowing challenges:


zondag 1 maart 2020

WE LOVE TO CREATE CHALLENGE #3 ANYTHING CREATIVE MIXED MEDIUM GOES WITH POLKADOODLES XXX

Hi there crafters out there, it is time for a Brand New Challenge over at the We Love To Create Challenge Blog....are you ready for it.....sponsored by the amazingly talented Polkadoodles!!

Polkadoodles Ltd


So what do I have in store for you for this challenge...


 We Love To Create Challenge Blog

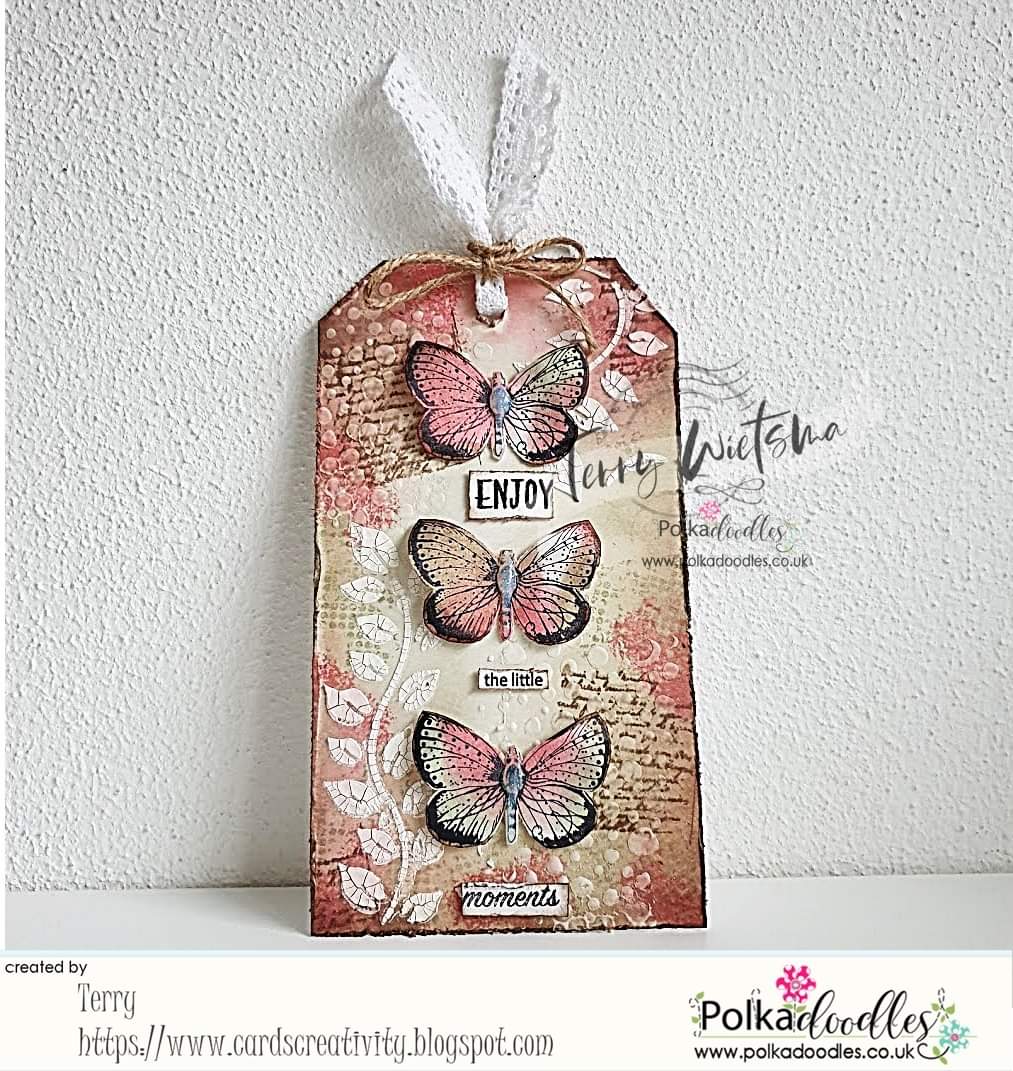
This time I made a Tag, I thought it was time for something else then cards....so I decided to make a Tag. I have cut the the Tag from a piece of cardstock, made this Tag myself ....this way you can decide what size you want it to have......


I started with the background. It was made with a bunch of different colors of distress inks. I have used 4 different colors to color my background with. I played with lots of stampsets on the background. I worked with sentiments. I used the Texture Galore stampset, The stampsets are so versatile don't you think????? I have used and played with them on so many different projects and they are so easy to work with....what kind of project did you make with them? I am curious about that...


What I also used on the background is a stencil from Dutch Doobadoo. the leaves are pretty aren't they? I really love those they way they turned out with the crackle .....My butterflies were colored with Distress inks and the body of the butterflies were worked on with Glossy Accents, I thought it would give those georgous butterflies from the Papillon Clear Stamp set a "real" look.....
And last but not least I decided to play a bit with a sentiment stamp from the Perfect Wishes stampset, I cut out the words and devided my sentiments in between and under the butterflies. 


I must say that the Texture Gallore and Vintage Text Stamp sets are my favourite stampsets for my background, what are yours? I am curious what yours are......


Distress Inks
Crackle Paint

So if you wanna play along with the Challenge on the We Love To Create Blog, then just click the link and it will take you to the Blog and my amazing teamies creations.

If you would like to leave me a little comment that would be just awesome thank you very much.


I would like to join into the following challenges:


zondag 2 februari 2020

WE LOVE TO CREATE CHALLENGE #2 ANYTHING CREATIVE MIXED MEDIUM GOES WITH POLKADOODLES XXX

Hi there crafters out there, it is time for a Brand New Challenge over at the We Love To Create Challenge Blog....are you ready for it.....sponsored by the amazingly talented Polkadoodles!!

Polkadoodles Ltd


So what do I have in store for you for this challenge...


 We Love To Create Challenge Blog


 I was so sick of the rain, the hard winds feeling like it is Autumn, so I decided to create a Feel like Spring card, I started with a piece of cardstock and folded it in 3 pieces and colored it with different soft colors of distress inks.


When the first layer with distress ink was dry I went over it with gesso and I used my brayer to distribute it well over my background. I did this to make the colors even softer then they were..... Then I went over it again with the light colors of the distress ink. After that I stamped a flower from the Pretty Perfect Stampset  and a few butterflies were stamped, they are from the Flower Collage Stampset, don't you just love them? I colored the flower and the butterflies with the same light colors to make them fit onto my card


What I also did on the background was I used the stencil from the Flower Collage Stencil and Around the flowers I used a fineliner to make them POP out more....so what do you think? Did it work?  


And do you see all the little dots? I thought it would be nice to place some dots from the Snowflake Border Stencil on my background to make it more playfull.....and offcourse I had to surround my card with the doodles from the  Flower Collage stampset


So here is my finished card, I sure hope that you like my card and I hope that I can give you some inspiration with my card. I had loads of fun creating my card. I can't hardly wait untill you show yours.....


 The products that I have worked withe are:

Snowball/Snowy/Bubble/Dots Stencil

So you wanna join into the fun over at the 


Come on over and do join into the fun and while your there check out my amazing teamies creations, I am sure you are going to love them all.....
Have fun......


I would like to join into the following challenges:


Thank you so much for checking out my blog and if you would like to leave me a little comment that would be so much appreciated. Thank you so much.

Hugs Terry xxx


zondag 1 september 2019

WE LOVE TO CREATE CHALLENGE #9 ANYTHING CREATIVE MIXED MEDIUM GOES WITH POLKADOODLES XXX


Hi there crafters out there, it is time for a Brand New Challenge over at the We Love To Create Challenge Blog....are you ready for it.....sponsored by the amazingly talented Polkadoodles!!

Polkadoodles Ltd


So what do I have in store for you for this challenge...


 We Love To Create Challenge Blog


I made an Autumn Butterfly card, the ones that know me figured it out allready, I admit I am a Butterfly Addict, cannot help myself the butterfly is an amazing creature and I just love them. That's why I made a card with butterflies for the Challenge from We Love To Create.....

I started out with a piece of cardstock...I colored it with Distress Oxides, purple, orange and blue/green colors. I was using my Brayer to devide the colors on the paper for the background. I spritzed the inks with water and dried it with my Heattool.


After that my background was dry I played with some Gesso. Again with the Brayer I devided the Gesso on the paper untill I thought it was ligt enough. I have been repeating this a few times. 
After that, the background has been worked on with the Texture Galore, Honey Daisy and Vintage Text Stampsets. The Doodle Borders stampset is used all around my card. 


So what did I do next.....I had a second piece of cardstock or actually aquarell paper and played with water and distress oxides and Gesso.  Dried it up with my Heattool and than I stamped the Papillon butterfly on the paper with Versamark and embossed my butterfly. 


When My butterflies were embossed with white embossingpowder I took a babywhipe and tipped a bit of the ink on it, with the babywhipe I colored some corners of the butterfly. 


And here is the result. Than I played a bit with the Nuvo glitter Drops on the wings of the butterflies. And it gives them such a nice shimmer. 


After that I took the Paperpack Sentimentals and searched for a matching sentiment. I than cut out the words and placed them randomly onto the card.


So this is my card from upclose. I sure hope you like it and hopefully I have given you some inspiration on how to make a similar card like this one.


The products that I have been working with are:


So if you wanna play with these products too, than you can click the linky and it will take you to the store where you can do your own purchases.


Wanna join into the fun over at the We Love To Create Challenge Blog, we would love to have you join into the fun guys.....


I would love to join into the following challenges:


Thank you for visiting my blog and if you would like to leave me a little comment that would be very appreciated. Thank you so much..


zondag 4 november 2018

WE LOVE TO CREATE CHALLENGE #14, ANYTHING CREATIVE MIXED MEDIUM GOES


Hey there guys, Welcome to our new challenge,  A fabulous challenge sponsored by the fabulous 

Polkadoodles!!


Polkadoodles Ltd

So what do I have in store for this Month's challenge....

Are you ready for it.....

Here I go....


I have made an Autumn card for your inspiration, I played with the background with a lot of different colours.
The background was made with Distress Oxides and Distress Inks. I have chosen the autumn colors.


I worked with lots of different stamps from various clearstamp sets from Polkadoodles.


I build up my flowers and colored the flowers with Zig Markers, on top of the flowers I played with a white pen and some Glossy Accents. 
Last but not least I have placed the Sentiment onto my card. I hope you like my vibrant colored card and I sure hope I have given you some inspiration.


The products that I have worked with are:


So you wanna have fun too?? Than I suggest you come over to the 


and join into the fun, you even have a chance on winning a fabby prize from Polkadoodles.
And while your there check out my amazing teamies creations guys, they made it for your inspiration. You can even check out the individual blogs from my teamies and I am sure you are going to love what you are about to see. Come on over and have fun.


Thank you for checking out my blog and if you want to leave me a little comment that would be just great, Thank you so much.


I would like to join into the following challenges:


zondag 12 november 2017

WE LOVE TO CREATE, ANYTHING CREATIVE, MIXED MEDIUM GOES TUTORIAL TIME XXXX

Hello there crafters, Today it is Tutorial day for the 


 It is my turn to put a tutorial together for your inspiration and I just loved doing this for you.


I colored the ULA Image from Polkadoodles, with my copic markers.....I love coloring and this amazing cute girl was a lot of fun to color.

 So what I did was I cut a piece of paper that I wanted for my background, took some colors Distress Ink and splashed some water on top to let it flow over the paper. The best way to do that is to hold the paper between 2 fingers and then spray the water. You can rotate the paper so that water goes over it. That way you get a mix of colors on your background.


After the background paper is dry, I have added some color. Also, the brown color along the edges of the paper and a bit of green.

 Than offcourse I wanted to be sure that the background colors would fit with Ula....and I thought she did fit in perfectly.

 I thought the background was a bit bald, so I used a stencil to fill the background. The Grit Paste gives the flower a 3D-effect and takes in the color from the Distress inks.


When the Paste was dry I got my waterpen, the fabulous stampset from Polkadoodles, calles Bonfleur and stamped 2 butterflies from the stampset. I colored the butterflies with the Distress Oxide and cut them out of the paper. The background was colored with the Oxides too. This time I used the Distress Inks but you can easliy work with the PanPastels too. They work great on the background and also to color your Digi stamps and Stamps.


Working with the Paste gives the flowers a real 3D effect. Still thought the background was a bit bald so I stamped a few tiny flowers on the paper. I colored the tiny ones with distress too and I was happy with the result. 


A bit upclose so you can see what I mean with the flowers having a 3D effect with the Paste. 


Oke so my background is finished with the fab colors and the stencilled flowers. Now all I need is the colored image from Ula, so I decided to get some doublesided tape on it and placed the image on my background paper.


So what do ya all think, I am pretty happy about it, and if you tell me Mixed Mediums don't mix with digi images, you'r totally wrong eh? All it needed was a few words...I thought Sending Lots of Love would be just perfect....and to finish I have placed the colored butterflies on the flower and on top of the card and my card is finished. 


So there ya go, my project that I wanted to share with you for your inspiration is finished. I sure hope you are going to get your thinking cap on and get those fabulous digi stamps from Nikky, from Polkadoodles...I am sure you are going to love these cuties.....

Thank you all for stopping by and hope I gave you some ideas on what you can make with Mixed Mediums and Digistamps mixed with stamps.
Have Fun.