Posts tonen met het label Embossing powder. Alle posts tonen

zondag 30 september 2018

WE LOVE TO CREATE CHALLENGE #13, ANYTHING CREATIVE MIXED MEDIUM GOES WITH POLKADOODLES XXX


Hey there crafters,
Welcome to our new challenge,  A fabulous challenge sponsored by the fabulous Polkadoodles!!

Polkadoodles Ltd


So what do I have in store for you this CHALLENGE....
I made a .....Christmas Card for your inspiration

Are you ready for it.....

Here I go....


 We Love To Create Challenge Blog


I have made my first Christmas card for your inspiration. I worked on the background with black acrylic paint, when it was dry I played with Purple, Blue and White Acrylic Paints. I have stamped the cute Robin Branch Stampset, this cute stamp comes with a Die set too did you know?? isn't it just fabulous....This time I used only the stampset. 


And the little stars that I embossed are from the Winter Flurries Stamp Set. The branch is from the Robin Branch Stampset too and I colored it with Polychromos Pencils and after that, I played with glitter frost. And last but not least I stamped the Season's Greetings and embossed it with white embossingpowder. 


So there ya go, my project for this month's challenge is finished and I hope that I can give you some inspiration with my project.


Some of the products that I worked with are:

 Cute Robin Branch Stampset and Die Cut set

 Winter Flurries Clearstamp set

So you wanna join into the fun, than come on over to the 

WE LOVE TO CREATE CHALLENGE BLOG

And do check out my amazing teamies creations they made it just for your inspiration.

Thank you so much for visiting my blog and if you want to leave me a little comment that would be very much appreciated. Thank you 


I would like to join into the following challenges:


maandag 7 juli 2014

HOBBYACTIEF, WAT JE KUNT DOEN MET EEN ROZENSTENCIL, WHAT YOU CAN DO WITH A ROSESSTENCIL.....


Hallo allemaal, ik heb even wat gemaakt voor jullie, om te laten zien wat je met een Rozen stencil van Dutch Doobadoo kunt maken.

Hey there guys, I have made a little something for you to show you what you can do with a Roses Stencil from Dutch Doobadoo

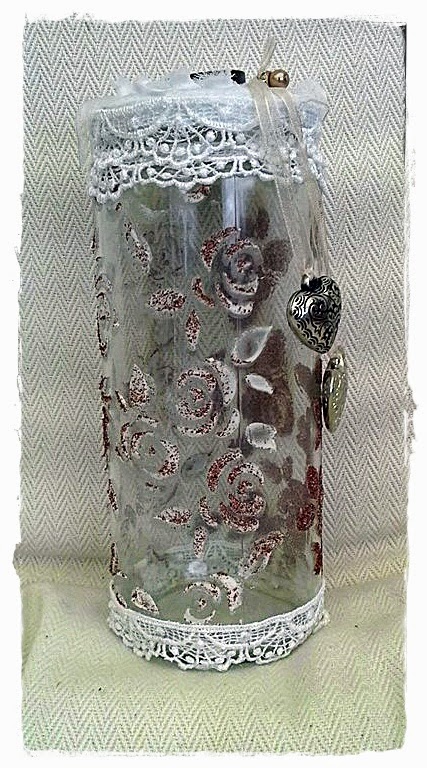
Wat heb ik gedaan.....ik had nog een oude pot staan waar ik wel wat mee kon doen, ik heb met de Rozenstencil en Modeleerpasta de vormen van de rozen op het glas gemaakt. Dus gewoon het stencil met een plakbandje rondom de Pot geplakt en langzaam met de Modeleer pasta erover heen om de afdruk van de rozen erop te krijgen. Even een beetje laten drogen. En toen met Embossingpoeder erover heen, verwarmd met de Heattool.  Zo ben ik de hele pot bijlangs gegaan totdat ik dacht dat het goed was.

So what did I do, I had an old jar and I thought I could do something with that. I took de Rosesstencil and Modelling Paste and got the shapes from the roses onto the jar. So you take the stencil and tape it around the jar, then you get your Modelling Paste ans slowly cover all the shapes of the roses with the Modelling Paste. Then I took the Embossing Powder and dried it with my Heattool. I covered the whole jar untill I was happy with it.

De ene kant van de Pot heeft een iets dikkere laag met embossingpoeder dan deze kant, waarom ....omdat ik aan deze kant wat embossingpoeder eraf geveegd heb met een schuursponsje.....voor het effect.

One side of the Jar has a thick layer of embossingpowder then this side, why ......do you ask...well because I have wiped some off on this side just to show the effect of it.....


De deksel van de Pot, eerste laag is Structuurpasta en is versierd met een grote kanten roos and kant. Een knoop die ik nog had liggen 

The Jar, first layer is Structure Paste. Decorated the Jar with a Huge lace rose, some lace on the borders and a button that I had in my closet.

En natuurlijk kon ik het niet nalaten om een paar metalen hartjes te plaatsen, ze zaten gewoon op me te wachten in mijn kast......

And offcourse I could not resist to place some metal hearts, I had them in my closet waiting for me to be used.

Ik hoop dat jullie het leuk vinden en dat ik jullie wat inspiratie heb gegeven om weer wat leuks te maken met de Rozenstencil. Dank je wel voor het kijken en tot de volgende keer....

I hope that you like my project and that I have given you some inspiration to make something with the Rosestencil. Thanks for watching and see ya next time....

Dit zijn een aantal artikelen die ik voor de Rozenpot heb gebruikt.Als je op het plaatje klikt kun je bij Hobbyactief in de webshop alle gegevens vinden 

These are some of the products that I have used for the Roses Jar. If you click the image it will take you to the Hobbyactief  Webshop and all the information


woensdag 4 december 2013

FRILLY AND FUNKIE CHALLENGE BLOG...... GIFT TAGS AND NOTE CARDS ,,,,,

Hey there guys, it is Wednesday today it is time for the second week on another fabulous challenge over at the


my teamie Cec has a fabby theme..So if you wanna join into the fun just click the linky from .....

the  FRILLY AND FUNKIE Challenge Blog...


And I am sure that your gonna loveee what your about to see, all the fabulous projects from my teamies, they are really fabulous 

The theme is, 'Gift tags and note cards', runs through Tuesday, December 9th. We hope to see you entering this time around so that you too can be in with a chance to win. 

But before I go to the Project that I made for this second week I want to tell you that this will be my last project for the Frilly and Funkie DT team....I want to thank you so much sweet Linda for your generousity and the chance to be a part of this AMAZING team for the last year. I had lots of fun making all of the projects, meeting my sweet teamies and surely hope that we will stay in touch through the blog and facebook. That would be just great.....Thank you so very much for everything Linda, I will miss you lots......xxxxx
Oke here we go with this second weeks project.....

So this is what I made

I just love Christmas......really I do and I do love the Christmas presents too....and I thought why not make a Christmas box to give to someone.....so what I did was I made a box and worked on it with lots wonderfull goodies....worked on this side of the box with the fabulous stencil of Wendy Vecchi, lots of embossing paste and embossing powder....a metal snowflake with embossing powder and some twine....

And offcourse I made a Tag to go with the Box.....again the fabulous stencil from Wendy Vecchi, just love the honeycomb one......the fabulous metall star and a button on top with twine....and the fabulous papers from The Tim Holtz.....I think they go really well together...I mean Tim and Wendy lol......

So this is another side of the box.....everyone who knows me they know that I just love hearts too so I could not resist to put a few hearts on the box too.....with a sentiment on them....

 
the hearts are worked on with distress ink and crackle....and the metall corners are just fabulous to use on whatever project or card your making.....

And this side I placed the sentiments from Tim Holtz Seasonal Chit Chat Stickers..did you ever try them out they are just great...... 
I wanted the lace to come back into the box, so it would fit the tag too.....so what I did was play with lace on a  bottle cap and placed a nice image of Santa in it on top some Glossy Accents....and played with Wendy Vecchi's honeycomb stencil and embossing powder. Don't you just love Christmas.....

And here is my finished Tag with Santa on it....also the papers from Tim Holtz mixed with Wendy Vecchi.....lots of lace and twine on top....I really had loads of fun working on the Christmas Box and Tag and if you want to have that much fun too then I suggest you come over to the Frilly and Funkie Challenge Blog and do join into the fun. And while your there just check out the Frilly and Funkie Girls and what fabulous creations they made just for your inspiration......Have loadsss of fun.....

Hugs Terry 
XXXX

zondag 13 oktober 2013

PREMIUM CRAFT BRANDS CHALLENGE #41 FALLING LEAVES....

Hey there guys, it is Sunday so that means we have another fabulous NEW challenge over at the 


First of all we wanna thank you for joining into the fun with the Challenge from last week....fabulous entries you all......


Some Challenge Rules........
1. You do NOT need to use Pan Pastels or our other products on your entries as long as you follow the challenge theme - obviously we'd love you to use the products but realise not everyone has them.
Each challenge runs from Sunday 8.00 am and ends the following Tuesday at noon GMT - this gives you 9 days to add your entry and join in with us. 


The winner of each challenge will be chosen at random by a random number generator.
Please note: Due to postage costs the Random Winner Prize will be posted to a UK postal address only - but overseas entries are still welcomed and will be included in the Top 3.


In addition to the random winner the Design Team will also choose their favourite Top 3 entries for that week who will all be able to proudly display their winners badge and may be asked to Guest Design for us. Overseas entries are welcome and will be included in our Top 3.
So we hope you like the changes and it has made it easier for you all to enter! 
So because the current challenge is still running, we don't have a winner to announce this week - the week 39 winner and Top 3 favourites will be announced next Sunday so make sure you follow our feed or sign up to get the emails when we post.  
Remember to join our Facebook group too, Premium Craft Brands, where we have daily inspiration and share some of our favourite makes & hints and tips every day, it's a great place to be. 


So this weeks challenge is.....Falling Leaves....

And has everything to do with Autumn...


I have worked on a Birdhouse but made it into a Autumn Falling Leaves house...the background was worked on with Gesso, modelling paste and a stencil from Wendy Vecchi.


allmost forgot to tell that I offcourse used some embossing folders to give the leaves some extra texture.


I worked on the bricks with Embossing powder and on top another layer of white Inkspray..and offcourse Metallic PanPastels, they give such a nice shine over the project.


The butterflies are colored with the GraphIt Markers, yessss I got to play with the fabby markers and they are really great guys.....and on top to seal them I embossed it with Utee. The leaves are from Wendy Vecchii's Art Parts and I sprayed them with Ink, embossed and on top I played with glossy accents and Crackle accents and to finish I played some more with the Metallic PanPastels......and some text to totallyy finish my project....I hope you like it. It was really difficult to take a deacent picture with all the shiny
products on my project lol.....but I think this is the best picture I could take......
So you guys wanna have fun too, then I suggest you come over to the Premium Craft Brands Challenge Blog and do join into the fun. And while your their please do check out my amazing teamies creations and their individual blogs, your going to be amazed by all the lovelyness....

Have fun
Hugs Terry xxxx

zondag 22 september 2013

PANPASTEL UK CHALLENGE #38 ANYTHING GOES....

Yesss it is Sunday and we have another fabby Challenge over at the

  PANPASTEL UK Challenge Blog

Our generous sponsor is 

PREMIUM CRAFT BRANDS,


And today the theme is Anything Goes....so you can make whatever you like isn't that just the easiest Challenge ......
This is what I made...

I thought it would be fun to make a wallhanger, the kind where you can hang a paper on so you will remember.....


the first layer that I have worked with was the Gesso......on top of that I used the Metallic Pans, did you ever use them, they are really fabulous to work with....I wanted to give my wallhanger an old look so what I did was first I played with Crackle and lots of it.....then I got the stencil and placed some embossing paste from Wendy Vecchi on top.....and offcourse some embossing powder.....


I did the same with the heart....and I think you will agree that it looks old.....


The wallhanger needed a word I thought.....and notes was perfect for it.....here you can see what I did with the background....looking good eh? 


The sentiments are from Tim Holtz his Chit Chat Stickers 


And here is my finished project, you can hang it on your wall with the ribbon that is on top of it and if you don't want to use that one you can hang it on your wall with a pin on the back of the wallhanger....I hope you like it and if you want to have fun like I did then you should come over to the PanPastel UK Challenge Blog and play along and do join into the fun....

I would like to enter the following challenges:
Crafts-Too Challenge You: Challenge #3 Texture and a bit of Shimmer, I have added embossingpowder, to give it a bit of shine and I just LOVEEEE Vintage

Thank you for checking out my blog and reading my story 
Hugs Terry xxxx