vrijdag 15 februari 2013

FRIDAY FOCUS ON FRILLY AND FUNKY....WHAT TO DO WITH THAT FABULOUS LACE.....

Hey there guys, it is my turn to show you this week's Friday Focus using the fabulous Venise Lace that Linda sells in her shop.


 I chose the Venise Lace that I have in my Craftroom but there are a lot more in Linda's Store. You really should check it out, because as our Friday Focus product, it is an additional 15% off the already low prices that Linda offers in 


Oke, so perhaps you think why is she working with the white and almost white lace? Well I will tell you why, you can use your lace just with the white color but you can also work on them with Inks, Distress Stains, Glimmer mist and even Distress Markers......And the good part on lace is, that you can always work WITH them on your projects, there is always a little place on your project where you can place the lace. I just love working withlLace and I think it gives it THAT special look. I think that I am an addict lol....


I have worked with these fabby products from Linda's store....Some Stencils from Dyan Reavely, the Stampset from Tim Holtz and offcourse that fabby stampset from The Wendy Vecchi.


I decided to show you 2 different sides of a Goodiebag and what you can do with the lace...One side is worked with the plain white Venice Lace 


Oke so I was telling you about those fabby stencils from Dyan Reavely, I love working with them I used the  Distress Inks such as Victorian Velvet, Fired Brick and Spun Sugar as well.  Stamped a on the front and worked with the White Paint Dabber as well.


The back of the Goodiebag is worked with the simular products but is completely different.


Then I thought I would stamp up a Butterfly from the gorgeous stampset Blueprints from the Tim Holtz and colored it with the Distress Markers.


Oke so here is the front of the Goodiebag, I worked with the white Venise Lace, I placed the lace underneath my image, that always looks nice, so you can do that....and at the bottom and the top of the Goodiebag. To finish the front I placed the metal Filigree embellishment with the hearts. Linda has crinoline in her shop too, You see the red colored and pink colored pieces of ribbon on top? They were white before I got my hands on it. The Crinoline is very easy to color. You can just spray some distress ink, dab with the distress stain or spray some glimmermist on to it, then dry with the heat tool and your crinoline is colored beautifully. And the good part is you can give it any color you want to fit your project. 


So the Frayed Flower was white but I wanted it to be a bit pinkish....what I did was, I played with Distress Stains such as Fired Brick, Spun Sugar and White Picket Fence....I was not happy with the color it turned out to be so I played some more with the Glimmer Mist and added some water. Then I was happy with it. When you add color to your Lace you will have to make sure it is dry before you apply it onto your project, especially when it is a paper project. So what I did was, I took my heat tool and dried the lace with it before I applied it on to my project.


I thought something was missing underneath my heart so I wanted to add lace underneath to give it a classy look.  So another thing I did was, I took the creamy colored ribbon and started with the Distress Stain and Glimmermist to give it a different color. You should have seen my fingers lol....it was like my fingers were bleeding they had such a red color......but when you look at the ribbon you would get a different idea because it is not THAT red eh? It is so much fun to play around with white lace and give it a color you want ...


Oke so this is the finished back of the Goodiebag I have worked with the colored lace.....Hope you like how it turned out. So one last thing for me to say is I wish you lots of fun playing around with the lace and hope you check out Linda's store for the absolutely fabulous Venise Lace that she has there waiting for you.


Hugs Terry 
xxxx


zondag 10 februari 2013

PANPASTEL UK CHALLENGE #6, LOVE & ROMANCE


Hey goodmorning on this fabulous Sunday,we have another fabby Challenge over at the 

Did you ever visit our 
 generous sponsor 


they have a fabulous prize for the winner of the challenge.....check out the store guys, and you will have fun and will find everything you  need to keep on crafting....wohooooo check this out ...
This week over at the PanPastel UK Challenge Blog we have a challenge theme called, Love and Romance, now this is not that hard eh? Better get your thinking cap on and get crafty, you can even win a fabby prize.
Come on over to the Challenge Blog and do join into the fun. And fun is what your gonna have....check it out...
So this is what I made.....


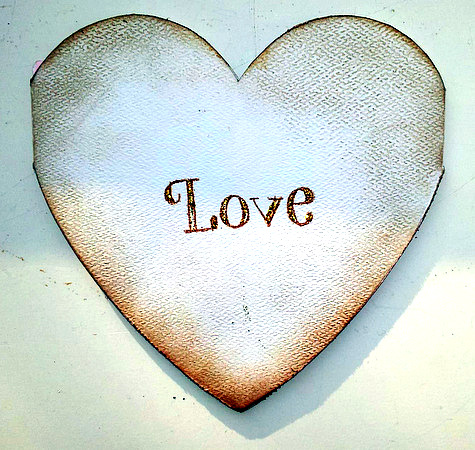
So I made a heartshaped card, worked with the brownish PanPastels and stamped the swirl from The Wendy on the front, I colored the swirl with the Graph-it Markers and placed a bit of gold stickles on top, to give it that classy look.


Oke here we have the inside of the Heartshaped card....I chose the image of this lovely vintagy girl.....I just love to work with the vintage images, I colored her a bit with the Graph-it Markers, and worked on the border with hearts too, I played with the Pinkish soft Color. Both sides of the Heart have a Noor Design heart on it. Aren't they just great...

And where there is a front.....yep there is a back too....lol......so this is the back of the heartshaped card and I played with the PanPastels too....Another sentiment stamped on it and some gold stickles and my Love and Romance project is done...so now I hope you like what I made and it will take you to the PanPastel UK Challenge for another peek of what amazing projects my amazing teamies made for your inspiration. Just check it out guys and if you want to leave me a little love, please do I just love reading your comments. 

Hugs Terry 
xxxx


zondag 3 februari 2013

PANPASTEL UK CHALLENGE #5- ANIMALS.....AND MORE....


Hey there guys, it is Sunday, so that means we have another fabulous challenge over at the PANPASTEL UK Challenge Blog...
Did you ever visit out 
 generous sponsor 


they have a fabulous prize for the winner of the challenge.....check out the store guys, and you will have fun

The theme for this weeks challenge is Animals....so you can make whatever you like as long as it has an animal in your project. This is what I made....

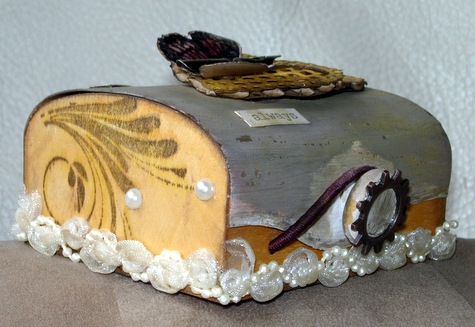
I made a Treasure Chest, with lots of Gesso, PanPastels, Graph-it Markers and Distress inks and yesss Crackle....lol...and the people who know me so well know that I just loveeeeee Butterflies and Crackle lol. 


The Top of the box is colored with the Pans and I covered it with Crackle to give it an even older look. The hearts that I placed are made with a Noor Design Die and then colored with the Graph-it Markers. I placed the hearts onto corrugated paper. The edges are worked on with Panpastel Raw Umber and Diarylide Yellow.
The butterfly is the fabulous one from the Wendy Vecchi and I just love it, placed a Pen Nib on top to decorate it some more....I worked on the Treasure Chest with distress inks and crackle and my top of the treasure chest is done.....and offcourse a sentiment could not be missed, I played with the Chit Chat stickers from Tim Holtz. 


The side of the Treasure Chest has been colored with the Graph-it Markers, did you ever use them? You  did not.....my goodness you don't know what your missing cause they are really cool and work on all kinds of  materials and they blend so well together. So I had lots of fun coloring with them. The pretty swirl is stamped onto the side and it is from The Wendy Vecchi's stampset. 


This is the backside of the box, I thougth it would look nice to place a metall piece on the back and in the middle a pearl to give it a classy look. 


And this is the front of the Treasure Chest, it has a metall piece from Tim Holtz on it and the borders are worked on with that fabby lace with pearls....So I hope you like what I made for your inspiration, 

You wanna have fun too, then I suggest you come over to the 


and do join into the fun and fun is what your gonna have and while your there check out my amazing teamies creations to see what they made also for your inspiration....Your going to love what your about to see, I am sure of it.  and above all HAVE LOTS OF FUN......

I would like to join into the following challenges:


Thank you for your time and if you would like to leave me a little love, be my quest.....I really love to read your comments...thank you so much......

Hugs xxxxxxxxxxxx


zaterdag 2 februari 2013

SATURDAY STEP X STEP FRILLY AND FUNKY, ALTERED HEARTSHAPED BOX

Hey there guys, this time it is my turn to do a Step X Step Post for Frilly and Funkie ....wohoooo.
I altered a Heart shaped box and will show you how I made it and the materials that I used.


Oke here we go, the materials that I used for the hearshaped box is offcourse a box, a nice piece of lace, distress crackle White Picket Fence, Distress Crackle Stickles Rock Candy, Distress Stains; Metallic and Fired Brick, Distress Ink; Victorian Velvet, Fired Brick, Tattered Rose, Vintage Photo and Walnut Stain, and the .....I will put them all underneith the post. 


For the word LOVE I worked with the Embossing Folder from Tim Holtz, Valentine. I embossed the words and cut them out, worked on it with Fired Brick and the Crackle White Picket Fence...


And for the hearts I stamped the hearts from the stampset Valentine from Tim Holtz and played on it with Distress Stain Fired Brick, sprayed some water on it to make the color a little softer and on top Crackle Accents.


The box first layer was worked on with Gesso and  the lace was white before.....but when I was done with it, it had two different colors, the Metallic Stain was used and the Victiorian Velvet Distress Ink. The box was colored with the Fired Brick and Metallic Stain and on top I played with the Crackle White Picket Fence to give it this crackled look.


So this is the finished look on the top of the Heartshaped Box.....I am very pleased with it.


So offcourse now it is time to decorate the box, remember the colored white lace.....well I placed it on the side of the top of the heart box. I think it looks pretty good like this....so what do you think?


The rose on the right side is not worked on with anything, that is how I started....the roses on the left side are worked on with glimmermist and with Utee, don't you just love the Porcelain look......I do...
It is very easy to do, you dip the roses into the Utee when they are still wet, then you dry with your heattool and do this a few times.....After 3 or 4 times of dipping the roses into Utee you get this look.


So the lit of the heartshaped box was decorated with the 3 roses, the Hearts, the sentiment LOVE and a butterfly from the Wendy Vecchi, and the corner underneith....I am pleased with it and I hope that you liked the Step X Step that I have made for you. I hope when you do you will have lots of fun with it.


And this is the side of the box, I hope you like my altered project. By the way you can purchase all the products that I used on the project in Linda's shop.....just click the linky below and it will take you there.
Thank you for listening and watching my Post.

Most of all....have lots of fun altering a box...
Hugs Terry xxxx